Sunday, November 29, 2009

Christmas Stamp-a-Stack Cards

Here are the projects we will be making for my Christmas Stamp-a-Stack. It is happening this Saturday - December 5th and you can make 10 cards for $15 or 20 cards for $25. You must RSVP to me ASAP!!! Every year I try to make each card different from the others so that you're walking away with 5 different unique designs. This year is no exception!


The first card design is completely CASE'd from my friend Amy. She sent me it a couple of years ago and I really like the colors.

The second card uses a color combination inspired by some of our current Christmas designer series paper and uses our new stamp set Delightful Decorations with its coordinating punch.The next card uses a unique color combination that comes from the designer series paper used in it. I also used a little bit of glitter to jazz this one up even more.The next card I CASE'd but can't remember from where. I just love the deer transformed into Rudolph! This card gets jazzed up with an embossed background and bright, fun ribbon. The last card is one I've been wanting to try and finally took the plunge - using acetate (window sheets). I love how this is a simple card but looks like so much more because of the clear sheet! Too fun!


I do hope to see you this Saturday! If you have questions or comments, please feel free to contact me!

Wednesday, October 28, 2009

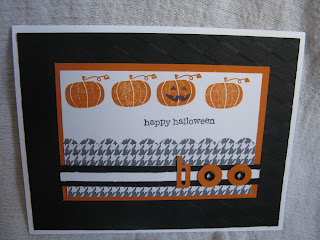
Halloween Card

My rotating hostess club has been doing swaps each time we meet and last month (September) we did Halloween/Fall cards. I typically do something more fall-like instead of Halloween but as I looked at the stamp sets I had on hand I realized I didn't have any really good fall sets I wanted to use PLUS I had just gotten the Night and Day specialty designer series paper found in the holiday mini and knew I wanted to use it! So, the ideas started swirling and I ended up with this:


Here's a close up that shows a little more of the details.

Tuesday, June 30, 2009

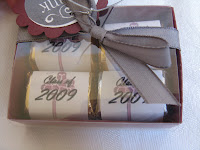
Josh's Grad party Favors

Well, graduation was a month ago but I realized I never posted pictures of the party favors we (Colleen, Josh, my mom and I) worked so hard on. I still have a few left over so that's what I took the picture of. We made almost 60 total. Josh's school colors were maroon, black and silver so that's what colors we used - of course!
Josh designed the labels using his school's mascot.

Sunday, June 28, 2009

Craft From Ellie's Party

Well, I shared with you Ellie's banner and I thought I would also share with you the craft I put together for the kids to make. Using my big shot, I cut out scallop circles from craft foam sheets in various colors, then I cut out each child's initial using the alpabet dies and white craft foam. I punched a hole in the top and put a jumbo brad so they can either hang it on a nail or put ribbon through and hang it that way. I bought some foam stickers and they were able to make their own initial "plaque!" Here's a picture of what Ellie's looked like (that I put together)!

I really love how the big shot allows you to be able to do fun stuff like this. I hope this inspires you to create a fun craft for your kids!!

Saturday, June 27, 2009

Eliana's Banner

June 12th of this year was my daughter's 2nd birthday. Because life had been so crazy with my oldest's graduation from high school, I didn't make invitations to her birthday party BUT I did borrow my friend Robyn's alphabet and pennant die cuts so I could at least make a banner. I'm not sure the pictures do it justice, see what you think!


The colors I used matched the plates she "picked" out that was kind of tropical. I used Pink Passion, So Saffron and Gable Green - very bright and girly!

Wednesday, May 20, 2009

Gifts for my Girls

Tonight was our last night of Wednesday night activities so I wanted to make a little "something" for my girls. My friend, Robyn, had a cute little frame that I saw the other night and she told me she got it at the dollar spot at Michael's. So, I was there the other day and looked and, sure enough, they had some! I got some in different colors and then after I bought them thought that, perhaps, I should have gotten them all in the same color that way the girls wouldn't be saying stuff like "Oh, I wish I'd gotten the pink one", etc. I decided the easiest way to take care of it was I wrapped them in decorated white paper sacks and just passed them around and told them they couldn't negotiate with each other! :) Here's the picture of all of them:
and a couple of them by themselves so you can see them close-up.


Here they are all wrapped up and ready to go!

Tuesday, April 28, 2009

Birthday Card Stamp-a-Stack Projects

We are a little over a week out from my May Birthday Card Stamp-a-Stack and I have the pictures to post of the projects we'll be making. I'm really excited about the class and hope you'll be able to join me! We will be doing the five projects pictured here and you can choose to either make two or four of each of the designs. It's $15 for 10 and $25 for 20 and the cost includes envelopes. To register for the class, call the Arts and Crafts Center at 747-3482. You can attend on either Thursday, May 7th from 7-10pm or Saturday, May 9th from 10am-1pm. What's great about these cards is most of them can be anything - they don't HAVE to be birthday! So, if you need a Mother's Day card, just put a mother's day sentiment or if you're thinking ahead to Father's Day - make one of your cards that! I try to have out different greetings for you to be able to personalize to meet your needs! I look forward to seeing you there!

The first project is such a fun, colorful one perfect for a child or even just a fun card for an adult friend!
The second one is such a pretty card - I love Cameo Coral and Kiwi Kiss together! This is also a fun pop up card so it's different from a standard card! (I want to tell you a little story behind this card. I was trying to finish up all the designs yesterday and was down to this one and had it started and realized I wanted to use Eastern Blooms. I went to get it from my shelf and couldn't find it. I looked and looked and couldn't find it anywhere! I had a meeting to go to last night and by the time I got home I was ready for bed so I didn't look any more then but was awoken at 3:30 this morning when my daughter fell out of my bed - hate to say I'd fallen asleep and totally forgotten the fact that she was in bed with me! Well, I couldn't go back to sleep because I kept thinking about this stamp set and trying to figure out where it might be and kept praying about it and stressing about it! I finally went to sleep around 4:30am but never got up to go look! When I did get up this morning, though, that's the first thing I did was go look for it and I finally found it - it had fallen down behind my paper holder where I couldn't see it along with another set I'd totally forgotten I had. To say I was elated is putting it mildly! I said a sincere "Thank you, Lord!" and quickly finished up my project!)
Can't have a birthday card class and NOT use Crazy for Cupcakes! I still love this stamp set using Pretty in Pink and Chocolate Chip! As you'll notice, this card has a fun surprise to it, too! The next card I made using the bird from the Always set - I just love the bird in this set and think this makes such a pretty card!
We needed a masculine card to go in with all of these cards so I used the Inspired by Nature set to make one. Both my husband and oldest son really like this one so that must be a good sign! I must admit it wasn't my original idea. I got the idea from this card on Splitcoast.
Well, now you've seen them so come join me in making them!